
Tutorial: How to stitch Insta360 Pro2 underwater 360/VR videos with Insta360 Stitcher
Written by Axel Busch on 9 April 2021
Insta360 Stitcher Version 3.0.0 on Windows 10 Pro
Insta360Stitcher is a free software from Insta360 to stitch footage recorded by their Pro, Pro2 and Titan cameras into an equirectangular 2:1 format suitable for uploading to various video platforms and VR goggles. It can be downloaded from the Insta360 website after entering your camera’s serial number and is a great tool for high quality virtual reality video stitching.
Note: the official download version of Insta360 Stitcher is not compatible with NVIDIA GeForce RTX 30xx or 40xx series GPUs or Radeon Pro series GPUs on macOS. Do not despair - an updated version is available! You can download it from our support page or contact Insta360 technical support and they will send you a link.
Preparation
The very first step is to copy the recordings and project files from the camera’s memory cards to a suitable storage medium for editing. A 6-port USB 3.0 hub with microSD-card readers is highly recommended.
The storage/editing medium does not have to be an internal SSD, even inexpensive external USB 3.0 and Thunderbolt SSDs are more than fast enough for the data rates involved in stitching 360/VR video from the Insta360 Pro2. But internal or external “old-school” hard drives will slow the stitching process down - unless it is a fast video production RAID array.
Remove the 6 micro-SD cards from the base, as well as the SD card from the battery compartment, and copy all files onto a SSD drive. A complete project folder will be typically named something like “VID_20160212_004459” and includes a total of 14 files.
The 14 files making up a complete Insta360 video project.
If you can’t find the the xxx_lrv.mp4 and pro.prk files, these can be found on the SD card in the battery compartment.
Step 1: Review the preview file for relevant segments
The Insta360 Pro series cameras save a pre-stitched preview file onto the SD card. We recommend that you watch the preview file and write down any interesting segments that you would like to stitch. This allows you to stitch only the relevant segments rather than the whole video, and can save a lot of time for longer recordings.
The preview file does not include any 360 meta information and will not play as a 360 video when watched in the free VLC media player. However, we find that “feature” quite helpful for reviewing and selecting segments, as it’s easy to see the whole area at the same time.
If you want to watch the preview file in 360 mode, you can use the free Spatial Metadata Injector program to correct the meta information, or use a different player like the free GoPro VR Player.
If you have problems running the original version of Spatial Metadata Injector on your Mac with Apple processor, try our version: SpatialMediaMetadataInjector-v2.1.1.dmg
Step 2: Import Project Folder into Insta360Stitcher
To import the files you can simply drag the whole project folder (e.g. VID_20160212_052848) into the pane on the left-hand side (“Local”). The preview window will show a single lens camera view and start playing. You can pause the playback.
Insta360 Stitcher: Import project folder by dragging it into the “Local” pane.
Insta360 Stitcher: Imported project folder
Step 3: Adjust reference frame, orientation, and color
Make sure Content Type is set to “Monoscopic” in the “Stitch” section on the right-hand pane, then scroll to the “Reference Frame” section and click on “Set and Preview”. This will open the Preview window with a view of the stitched frame, and color adjustment sliders on the right.
Insta360 Stitcher: Preview window for adjusting horizon and color
You can now adjust the reference frame by moving the slider in the middle. The reference frame should be set to a view that is typical for the majority of the video segment you would like to stitch.
You can reorient the video by dragging in the preview window with the mouse. This only works if the Content Type is set to “Monoscopic” in the main window. Make sure the main subject is in the middle of the frame, and that the walls are vertical.
We recommend to turn on “Zenith Optimization”, unless you are using video lights mounted directly above or below the camera.
Click “Set As Reference Frame” to save your changes.
The Color Adjustment pane on the right-hand side is very useful for a quick initial color correction. We found that the following values are a good starting point:
Brightness: 0
Contrast: 20
Highlight: 3
Shadow: 5
Saturation: 5
Temperature: -20
Tint: 3
Sharpness: 85
The correct values for Temperature and Tint can be very different from these suggestions, depending on the manual White Balance of the recording, water color and depth. You can save these settings as a Preset by clicking on the + symbol. This allows you to quickly apply the same settings to other projects by clicking on the Preset. There seems to be a bug in the software in Version 3.0.0, and the value for Tint is not restored when selecting a custom preset.
Click “Save And Apply” to save your changes and close the window.
Step 4: Adjust stitch settings
After adjusting the reference frame and orientation, head back to the top of the right-hand pane to set the desired Content Type and stitch settings.
We recommend the following settings to achieve the best stitch quality. However, your shooting conditions, computer hardware, or project requirements might be very different from ours. Consider using these as a starting point and render a 30 second clip with different settings to find out what works best for you.
Content Type: “Monoscopic” to render a 2D video, and “Stereo (Left Eye on Top)” for 3D video.
Stitching Mode: New Optical Flow
“New Optical Flow” is the fastest stitching algorithm and usually provides also the best stitching results in regards to speed and quality of the stitch.
“Optical Flow” setting is slower, but Insta360 says it is more accurate for some subjects. We haven’t found any advantage using “Optical Flow” over “New Optical Flow” and recommend “New Optical Flow”.
“Scene-specific template” is often 2-3x as fast as optical flow stitching, but it does not correct parallax error or attempt to stitch close and far objects at the same time. The result is a more-or-less visible stitch line, similar to what you might know from Autopano Video Pro without D.WARP, or from Mistika VR without “Optical Flow”.
For most scenes, we recommend “New Optical Flow”. However, “Scene-specific template” can be better for some scenes where you have movement and fine detail - for example swimming past a large black coral tree or gorgonian fan. In this case, Optical Flow based stitching can produce mosaic artefacts, which can be very noticeable. Template based stitching will instead show some ghosting, but depending on your scene, that could be less noticeable.
Sampling Type: Slow
“Slow” results in the best image quality with a moving camera or subject.
For static scenes, “Fast” produces practically the same result - but also isn’t much faster.
Blender Type:
“Cuda” for NVIDIA cards,
“OpenCL” for ATI cards and on macOS (macOS does not support NVIDIA cards).
Optical Flow stitching range: 20 (degrees)
This setting specifies the horizontal angle of view that is used to calculate the seam area for “Optical Flow” and “New Optical Flow” stitching. It has no effect for template based stitching.
A larger angle requires more time to stitch, but usually results in a better stitch, especially of close objects.
Try setting it to a smaller angle (e.g. 10 degrees) when the default setting produces parallax error or mosaic pattern - for example when a small fish swims through a seam in front fine detailed background such as coral or fans. Then you want the angle to be just big enough to fully enclose the fish, but as little of the background as possible.
The maximum angle for Monoscopic (2D) video is 20 degrees. The maximum angle for stereoscopic (3D) video is 16 degrees.
Template stitching range: 3 (degrees)
This setting specifies the horizontal angle of view that is used to calculate seam area for “Scene-specific Template” stitching. It has no effect for optical flow stitching.
A smaller angle creates a sharper stitch line. A larger angle results in more ghosting of moving subjects.
The default setting creates a very sharp and noticeable stitch line and we recommend setting this to about 3 degrees if using “Scene-specific Template” stitching.
The maximum angle for Monoscopic (2D) video is 20 degrees. The maximum angle for stereoscopic (3D) video is 16 degrees.
Use Default Circle Position: On
Instructs Stitcher to optimize stitching of the Zenith (top of the frame) and under dark conditions.
Try setting this to Off if you’re not satisfied with the stitching of the Zenith.
Smooth Stitch: On
Smooth Stitch reduces color differences between the individual lenses, so that overall brightness and color are consistent across the whole image.
This setting is particularly useful for content with large light differences and when the footage was recorded using exposure modes “Auto” or “Isolated Exposure”.
Flowstate Stabilization: On
In some versions of Insta360 Stitcher this setting is called “Gyroscopic Stabilization”
Instructs Stitcher to use data recorded by the internal inertial sensor of the camera to automatically maintain the horizon and forward view in regards to the “Reference Frame” defined in the preview window.
Note: Disable this setting If you experience that the stitched video “drifts” to one side after stitching, although your camera is not moving.
Use Hardware decoding: 6
Software encoding speed: Highest quality (slowest)
This setting is only used when Hardware Encoding is not available.
A higher speed results in more stitching artefacts for subjects crossing the seams, such as mosaic pattern and distortion.
For static scenes, this may not be a problem and setting this to Fastest may produce the same results while being approx. 1.5x faster.
Use Hardware encoding: On
Depending on the machine, hardware encoding is about 3x faster than software encoding.
This option is usually greyed out at this point as it’s only available for 4K or H.265 output. We will come back to that in Step 7, after adjusting the output settings.
Step 5: Adjust clip start and end
By default, Insta360 Stitcher will render the whole clip. To render only a segment, you have to set From and To values in the “Cut Video” section. Scroll to the “Cut Video” section in the right-hand pane and enter the start and end times for this segment.
If you’re exporting for later editing rather then viewing, we recommend to add an additional 4-10 seconds at each end to give the editor some additional room.
Insta360 Stitcher: Adjust clip length by setting From and To in the “Cut Video” section
Step 6: Adjust Output settings
Scroll to the end of the right-hand pane to adjust the output settings. Here you can adjust the export file type, codec, and options. The optimal settings depend on how the video is going to be used:
Editing / Uploading
Resolution: 8K
Vimeo supports only monoscopic 2D videos with a maximum resolution of 4096x2048.
Facebook supports monoscopic 2D videos up to 5120x2560 and stereoscopic 3D up to 5120x5120.
YouTube supports monoscopic 2D videos up to 7680x3840 and stereoscopic 3D up to 7680x7680.
Headjack and DeoVR support monoscopic 2D videos up to 8192×4096 and stereoscopic 3D up to 8192x8192.
Output Format: MP4 (H.264/H.265)
Some editors prefer “MOV(ProRes/H.264/H.265) for further editing in FCPX, Premiere Pro, or DaVinci Resolve.
There is no quality difference between MOV and MP4 as a container format. The quality is determined by the codec (H264).
Most platforms for online distribution support both formats, although many recommend converting to MP4 before uploading.
Codec Type: h264 codec
We recommend H264 at the highest supported bitrate (350 Mbps for 2D, 480 Mbps for 3D). The H264 codec is less compressed than H265. It’s easier to edit and processes faster on platforms like YouTube, but file sizes are larger for the same quality.
The H265 codec is ideal for playback on modern computer hardware and smartphones, which support the codec natively for playback. This is not the case for editing, and even high-end 2021 PC hardware struggles editing 8K H265.
Usually ProRes is the codec of choice for intermediate files for editing. However, the only version that Stitcher supports is “ProRes 422 HQ” at 4000 Mbps. As the image source is only 8-bit 4:2:0, a 4:2:2 codec offers no improvement while dramatically increasing the file size (30Gb/min for 2D, 60Gb/min for 3D). Even high-end 2021 PC hardware is unable to play 8K ProRes 422 HQ.
Profile: Baseline
Baseline uses the CALVC algorithm, which is less computationally intensive to process and play and therefore better suited for editing.
Choose “High” can use the CABAC algorithm, which yields better visual quality at the same bitrate, but is more computationally intensive to process and play. It is the recommended profile for uploading.
Bitrate: 350 Mbps for 2D/30fps, or 480 Mbps for 3D/60fps
350Mbps is the highest bitrate supported by Insta360 Stitcher for 2D output in H264 at 30fps.
480 Mbps is the highest bitrate supported by Insta360 Stitcher for 3D output in H264 at 60fps.
These bitrates are comparable to 100 Mbps for 4096x2048 (4K), and that’s usually fine for editing 8-bit 4:2:0 material.
For playback on Oculus Quest 2, Pico 4 and newer
3D-360 (Stereoscopic):
Resolution: 5760x5760
Output Format: MP4 (H.264/H.265)
Codec Type: h265 codec
Bitrate: 130 Mbps
Frame Rate: as recorded (default 29.97)
2D-360 (Monoscopic):
Resolution: 8192x4096
Output Format: MP4 (H.264/H.265)
Codec Type: h265 codec
Bitrate: 130 Mbps
Frame Rate: as recorded (default 29.97)
For playback on Oculus Go and Oculus Quest
3D-360 (Stereoscopic):
Resolution: 4096x4096
Output Format: MP4 (H.264/H.265)
Codec Type: h265 codec
Bitrate: 100 Mbps
Frame Rate: as recorded (default 29.97)
2D-360 (Monoscopic):
Resolution: 5120×2560
Go/Quest support maximum of 5760x2880
Output Format: MP4 (H.264/H.265)
Codec Type: h264 codec
Bitrate: 100 Mbps
Frame Rate: as recorded (default 29.97)
Insta360 Stitcher: Example output settings for 5.7K 3D playback on Oculus Quest 2 (H.265 with 130 Mbps)
Step 7: Turn on Hardware encoding
If the output settings configured in Step 6 support Hardware Encoding, we can now turn it on in the “Stitch” section at the top of the right-hand pane.
Hardware Encoding is only available if one of the following requirements is met:
Any resolution with Codec Type h265 on Windows.
Up to 4K resolution (with any Codec Type) on Windows and macOS.
To turn it on, head back up to the “Stitch” settings and tick the box in front of “Use Hardware Encoding”. Turning on Hardware Encoding can be 2-3x faster, so it’s worth turning it on if we can.
Important: If you make any changes to the Stitch or Output sections after turning on Hardware Encoding, Stitcher will reset the “Hardware Encoding” settings and turn it off again. Please make sure to turning on “Use Hardware Encoding” is the last step before starting to stitch.
Step 8: Stitch
Check again all settings, especially that Hardware Encoding is turned on if available. Then head to the end of the right-hand pane to set the output folder and filename. When using SSDs there is no performance penalty when exporting to the same drive as the source files, even if it’s an external SSD.
If you’re planning to copy the files to Oculus VR goggles we recommend to add “_360.mp4” to the file name for monoscopic video, and “_360_TB.mp4” for stereoscopic video. This helps the Oculus video players to correctly identify 360 2D/3D videos.
Click “Stitch Now”.
This will add a Stitch job with the current settings to the stitch queue and immediately start the stitching process.
Stitching is handled by a background process. You can continue making changes, even import other folders, and keep adding jobs to the stitch queue while the current job is being processed.

Insta360 Stitcher: Stitch queue with many jobs waiting to render.
Wait until the stitch is complete, then open the target location and view the video.
We haven’t had any problems with videos stitched with Insta360 Stitcher being not recognizes as 360 videos in VLC media player or when uploaded to YouTube. If you experience any problems you can use the free Spatial Metadata Injector program to correct the meta information.
If you have problems running the original version of Spatial Metadata Injector on your Mac with Apple processor, try our version: SpatialMediaMetadataInjector-v2.1.1.dmg
Batch List
Instead of “Stitch Now” you can also click “Add to Batch List”. The difference is that “Stitch Now” inserts the current clip at the front of the queue and immediately begins stitching when possible. “Add to Batch List” inserts the current clip at the end of the queue, and you have to start it manually or click “Start All”.
Conclusion
Stitching video shots with the Insta360 Pro2 underwater is as easy to stitch as videos shot on the surface, no special steps or templates are required.
The free Insta360Stitcher does an excellent job stitching and stabilizing the footage, and can even perform cutting, reorientation and basic color correction.
Head over to our YouTube channel to view some of our test recordings. These were all shot on an Insta360 Pro2 in Mantis Sub housing and stitched in Insta360Stitcher without further post-processing / editing.
Insta360 has also published several video tutorials about Insta360 Stitcher.
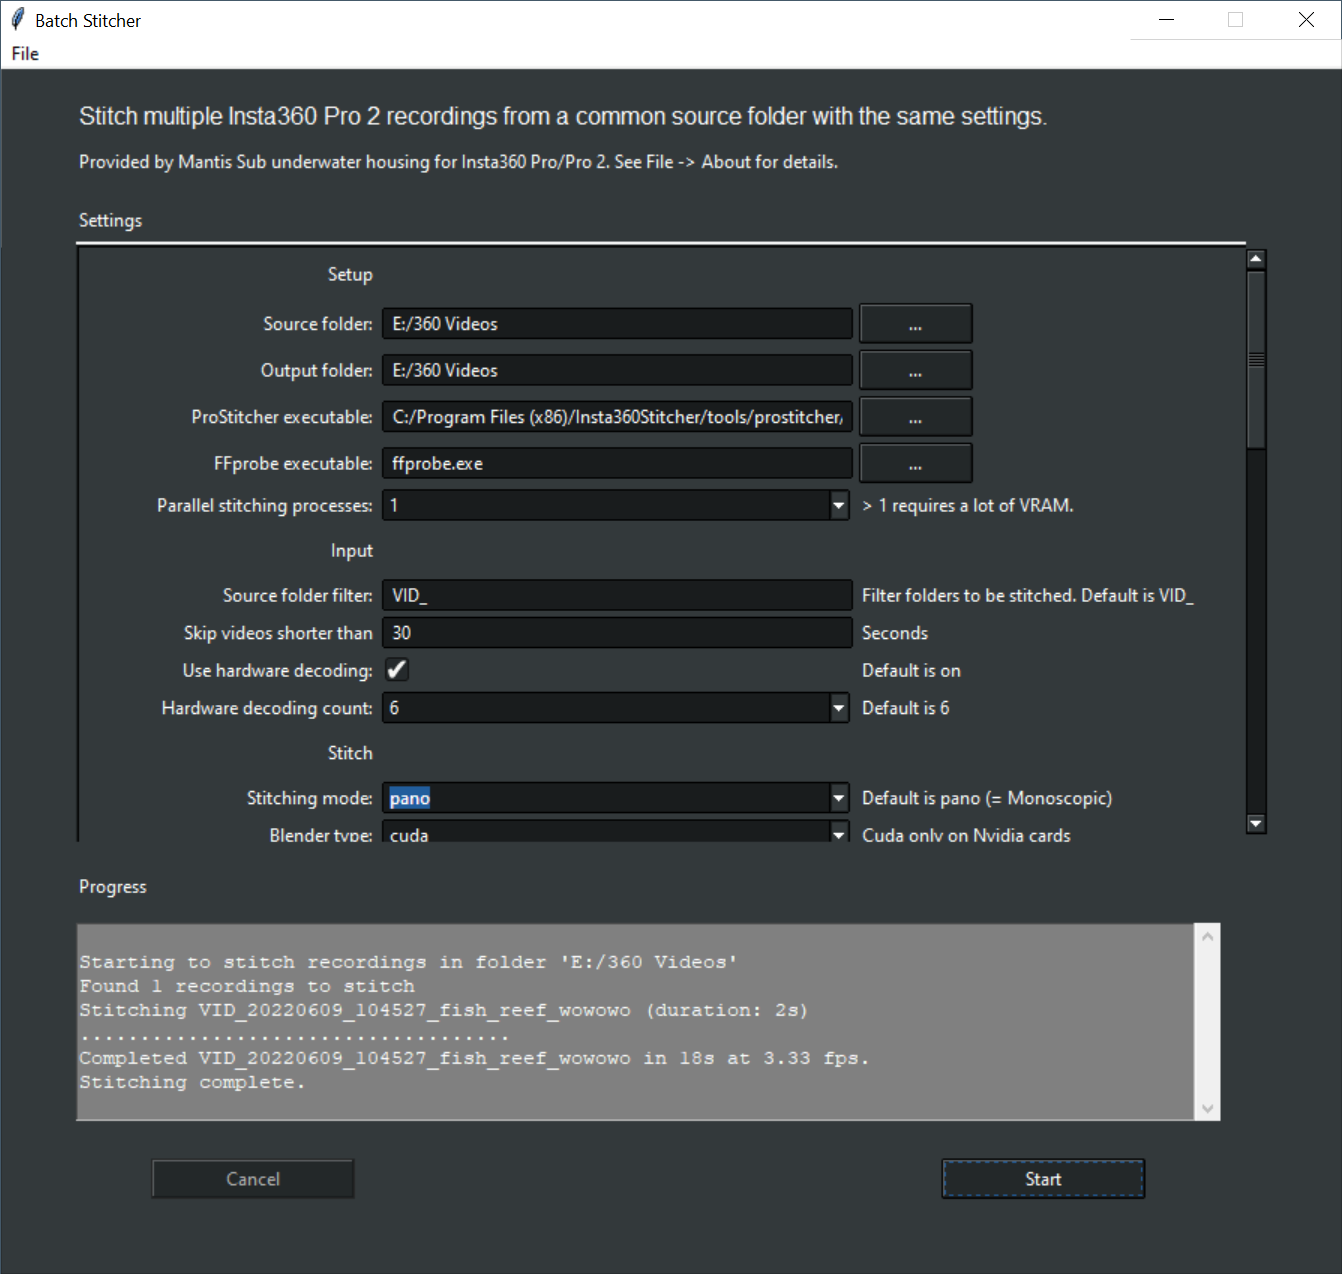
Batch stitching many recordings with the same settings
We have developed a utility program that can stitch many VID_xxxx recording projects in one folder using the same stitching settings. Installers for the latest release are
You can read the complete instructions and source code on github.
More from the Mantis Sub Academy.
With the Mantis Sub Academy we want to provide a set of free resources to help you getting started with creating 360/VR content. Here are some more articles: